let’s get crafty… DIY hairclips

hairclips final product

While my husband and I have been attending weddings like weekend warriors – it’s been difficult to justify experiments in the kitchen. Yes, I’m human and can only dance off so many calories (and those bridesmaid dresses are never forgiving are they!?) Truly, it’s a bit necessary give the baking and ice-cream trials a rest.

Combine the wedding eating and drinking extravaganza with the baby bonanza that is erupting among the other half of my friends/family and we have a necessary project. Yes folks, it’s summertime and therefore, appropriate to bring us all back to our summer camp days. Gather ’round the picnic table – we are about to get crafty.

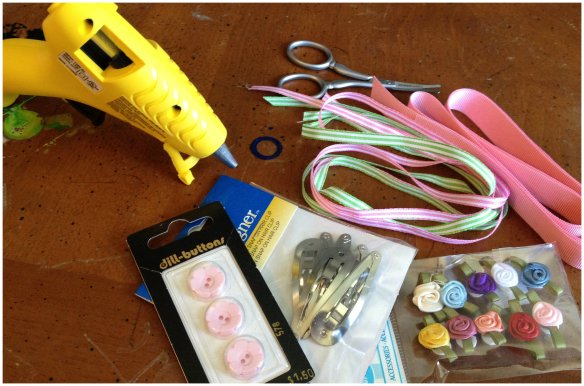
I had an idea of what I wanted to make for all the sweet baby girls that are about to arrive into the world (hair-clips!!) but I didn’t have any of the items necessary. So, I strolled over to the local fabric store, Stitches. They have a fabulous assortment of supplies and I purchased a small amount of ribbons, hair-clips and a few add-ons for about $6. Yes, you read that correct. $6!!! When does anything (let alone anything for a baby girl) cost $6? Almost never.

supplies hairclip project

The rest was easy and fun. I decided to cozy up to our “crafts” table (the table that my husband used as a child to paint his model airplanes), in the event that the project became messy. I plugged in my cheap-o glue gun, found a pair of sharp scissors and got to work.

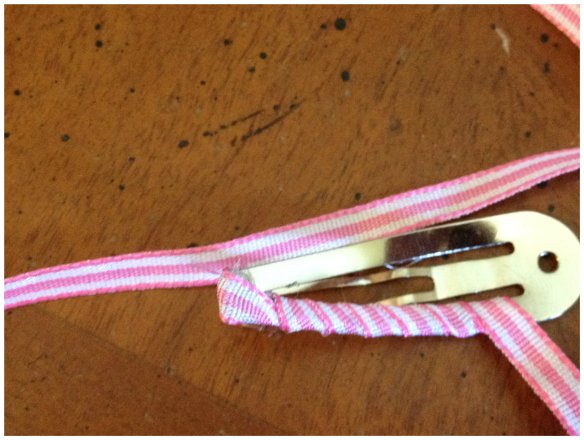
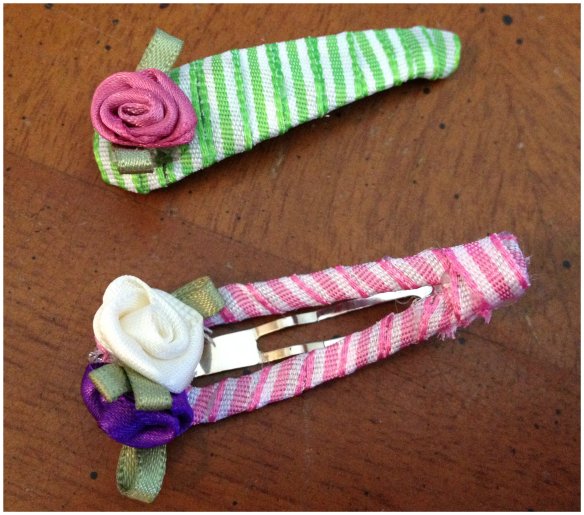
First, add a tiny dab of glue to the bottom of the tip of the hair-clip. Then, start to wrap the hair-clip with ribbon. Feel free to do a “practice wrap” before you commit to adding glue. Once you feel comfortable moving along, remember that it’s a good idea to add a bit of hot glue as you go. Stick to a system – ie. add a dab of glue on the bottom of the clip every time you wrap the ribbon around. This way the ribbon is secure along the metal clip. If you don’t add the hot glue as you go, the ribbon may slip and slide over time and the silver metal will be exposed.Collage 1 hairclipsCollage 2 hairclipsThat was easy, huh?

I’m pretty sure it took all of 5 minutes. So I made a second one. With pink, of course!

pink hairclipIt’s so simple (and cheap) and truly a thoughtful gift. As you know, I’m always a fan of a homemade gift. And I’m already dreaming up ideas for other barrettes and hairbands that would be super sweet. Big, poofy ribbon roses or sweet pink heart barrettes or we could go in an entirely different direction of whale ribbons for a preppy east coast nautical theme… the possibilities are endless!!!

Since I don’t have a little girl – I had my Lucy dog model the hair-clip. She stayed still just long enough for me to snap a picture. Pretty cute, huh?lucy modellucy modelI think so too!

Good luck and happy crafting!

XOXO, Em

let them eat ice cream (for the pool-less on a hot day)

photo (1)

A recent acquisition in my kitchen is an appliance that I probably would never purchase. It is, however, an appliance that someone might buy raffle tickets to win but after the excitement of the prize, it might sit in the basement, forgotten about until spring cleaning. That someone is a very kind colleague and the prize appliance is the Cuisinart Soft Serve Ice Cream Maker. My colleague asked if I would like the long forgotten ice cream maker. Without any hesitation (who would hesitate? It’s a FREE ICE CREAM MAKER!) I said yes and long story short, I, Em of deuxdilettantes, am the proud owner of a soft serve ice cream maker.

The timing of this addition to my kitchen couldn’t be any more perfect. With the recent change of temperature (hello Lake Washington, my savior from the heat), a bit of homemade ice cream felt just right. I invited Bee to join me in the christening of the ice cream maker. The whole event was a bit comical. It must have been 90 degrees in my flat. I don’t have AC and the windows hardly open. We watched the neighbors frolic in their pool as we made ice cream and wondered if we could tempt them with cool treats so that we might take a dip in the refreshing water. I’m pretty sure we made all the rookie mistakes as we created a lovely ice cream mess in my kitchen.

IMG_2473

It was messy (and that picture was taken after we cleaned up) but we had a blast. And we ended up with darn good ice cream.

Even if your not crazy about our flavor combinations, at least consider the following two tips:

1. The freezer bowl MUST be cold. The owner manual suggests 12 hours in the freezer but I suggest 24 hours just to be safe.

2. Adding anything solid (dare I suggest chocolate chunks?!) to the milk/cream liquid mixture WILL clog the machine and create a mess. We suggest allowing the mixture to thicken and then add, slowly.

photo

Lavender cardamom vanilla with chocolate chunk ice cream

Yields 1.5 pints

Ingredients

  • 1 cup whole milk (plus extra)
  • 1/4 cup lavender
  • 10 pods cardamom (split open)
  • 1/4 teaspoon vanilla
  • 1/2 cup sugar
  • 2 cups heavy cream (very cold)
  • 1/3 cup coarsely chopped dark chocolate

1. Combine 1 cup milk, lavender, cardamom and vanilla in a medium sauce pan. Bring to simmer and then reduce heat to low / low-medium. Gently stir and cook for about 20 minutes.

IMG_2458

2. Strain mixture and discard lavender buds and cardamom pods. Pour the mixture into a measuring cup and top off milk mixture to measure 1 cup. Put in refrigerator or over an ice bath.

3. Once milk is cold, pour into a mixing bowl and add sugar. Whisk or mix until sugar is dissolved. Then add cream. Mix and pour into freezer bowl. Turn on ice cream machine and let it do its magic.

4. As the milk/cream mixture starts to thicken to a soft serve consistency begin to add chocolate chunks a small spoonful at a time. Once the mixture is past soft serve consistency but prior to ice cream, turn off the machine and begin to scoop out ice cream into a freezer safe container. Freeze until mixture has hardened and then serve! Or serve immediately as soft serve!

Dutch chocolate with cinnamon and chocolate chunk ice cream

Yields 1.5 pints

Ingredients

  • 2/3 cup unsweetened Dutch processed cocoa powder
  • 1/2 cup sugar
  • 1/3 cup firmly packed brown sugar
  • 1 cup whole milk (very cold)
  • pinch cinnamon powder
  • pinch cayenne pepper
  • 2 cups heavy cream (very cold)
  • 1/4 cup coarsely chopped dark chocolate

1. Combine the cocoa powder with sugars in a medium bowl. Mix until lumps are removed.

2. Add the whole milk and mix until smooth. Add cinnamon, cayenne and heavy cream. Mix and pour into freezer bowl.

3. Turn on ice cream maker and allow to mix.

4. As the milk/cream mixture starts to thicken to a soft serve consistency begin to add chocolate chunks a small spoonful at a time. Once the mixture is past soft serve consistency but prior to ice cream, turn off the machine and begin to scoop out ice cream into a freezer safe container. Freeze until mixture has hardened and then serve! Or serve immediately as soft serve!

DSC_2914

Strawberry with balsamic caramel ice cream

Yields 1.5 pints

Ingredients

  • 1/3 cup and 2 tablespoons granulated sugar
  • 1 tablespoon water
  • 1/3 cup balsamic vinegar
  • 1 cup whole milk (very cold)
  • 1/2 cup firmly packed brown sugar
  • 1 teaspoon vanilla
  • 2 cups heavy cream (very cold)
  • 1 pint strawberries, hulled and pureed

1. Combine the granulated sugar, water and balsamic vinegar in a shallow pan. Bring to a boil and then reduce heat. Let simmer for about 15 minutes – until the consistency is thick and syrupy but not yet a caramel. Remove from heat and pour into a heat safe container. Set aside and allow mixture to thicken as it cools.

2. In a medium mixing bowl, combine the whole milk, brown sugar and vanilla. Whisk or mix until smooth. Then add heavy cream. Stir and then add to freezer bowl. Start mixing and as mixture thickens begin to add the strawberry puree, slowly.

DSC_2955

Allow mixture to continue to thicken and then slowly add the balsamic caramel.

DSC_2968

Once the mixture is past soft serve consistency but prior to ice cream, turn off the machine and begin to scoop out ice cream into a freezer safe container. Freeze until mixture has hardened and then serve! Or serve immediately as soft serve!

DSC_2982

As I write this, I realize that over the past week I have eaten more ice cream than I should ever admit to. But hey, that was all for research! It doesn’t count. We are dreaming up all sorts of ideas for the machine. There has been discussion of coconut milk… almond milk… sorbets… oh the possibilities!

Have a lovely week and stay cool. And eat ice cream!

XOXO, Em

mini strawberry-rhubarb crumbles

mini crumbles ready to eatWith May just around the corner, Seattle is tiptoeing into the early stages of local rhubarb season. And even though it’s too early for the local sweet strawberries, we compromised with organic strawberries from California (still west coast so it’s sort-of local…) so that we could make a strawberry-rhubarb crumbly crumble. After much discussion, we thought… sure it will taste sweet but let’s make it ascetically sweet by making mini crumbles. And then, as if that wasn’t enough, we decided to bake the mini crumbles in mini mason jars. Yes, we know – mason jars are everywhere. So maybe we are a bit late to the party but better late than never, no?

Humble crumbles these are not. They are adorable, picnic portable and perfectly portioned. With a hint of orange zest and a toasty pecan crunch, these little gems will be a spring-time staple, guaranteed!

berries and rhubarb1

Mini strawberry-rhubarb crumbles

Yields 4 X 8 oz darling little mason jars

For the crumble topping

  • ½ cup flour
  • 1/4 heaping teaspoon salt
  • 1/4 teaspoon baking powder
  • 1/4 cup filled with brown sugar packed halfway, fill remaining with white sugar
  • zest from 1/2 orange
  • 1/2 stick unsalted butter, cold and diced
  • handful of toasted pecans, cooled and coarsely chopped

For strawberry-rhubarb filling

  • 7 oz rhubarb, peeled and chopped into 1/2 inch pieces
  • 12 oz strawberries, stems removed and quartered
  • zest from 1/2 orange
  • 1 1/2 tablespoons juice from orange
  • 1/2 cup extra fine baking sugar
  • 2 1/2 tablespoons cornstarch

Preheating oven to 350°F.

In a medium-large mixing bowl combine rhubarb, strawberries, orange juice and zest, and sugar. Mix ingredients by hand, tossing to ensure rhubarb and strawberries are thoroughly coated. Add the cornstarch and mix by hand again.

Spoon the mixture into mason jars, leaving room for the crumble topping. Try to spoon in only the coated fruit. Then, add a little bit of the liquid mixture on top. Place the 4 jars onto a baking sheet and place in oven for 30 minutes.

pots on the ready 2

To make the crumble, combine the following in a medium mixing bowl: flour, salt, baking powder, brown sugar and white sugar, and orange zest. Mix until all ingredients are incorporated. Use a pastry cutter to cut in the pieces of butter until the mixture is pea sized crumbles. Gently mix in pecans and then transfer mixture onto baking sheet and bake for about 20 minutes at 350° F. Check on the crumble periodically, using a spatula to flip mixture once it starts to brown. You’ll know it’s done when it’s toasty.

crumbly crumbles

Evenly spoon toasted crumble mixture on top of the strawberry-rhubarb. Let cool 1-2 hours before lightly covering or enjoy on the spot!


strawberry rhubarb mini crumbles

Have a wonderful week! XOXO, Bee & Em

cooking with pomegranate molasses: muhammara

bell pepper

I recently found myself with more pomegranate molasses than I will need for the rest of my life. When my husband discovered this great cocktail calling for it, he ordered not 1 but 6 bottles of the precious ingredient. Just in case, you know… It’s up to me to find ways to use it. I knew it would take more than giving vinegar a break in my salad dressings (try to replace the vinegar with pomegranate molasses; it gives a nice sweet-tart flavor.)

muhammara

Pomegranate is used all over the Mediterranean. I remember drinking pomegranate juice in the streets of Istanbul, freshly pressed to order, and thinking it was the best thing I have ever had.

Pomegranate molasses is a thick syrup made of concentrated juice and sugar. Its sweet and tangy taste makes it a versatile condiment, whether it’s used in cocktails, vinaigrettes, marinades or glazes. It also pairs well with eggplant and tomatoes. And for a quick and easy treat, add a little bit to your yogurt along with some crushed unsalted pistachios and dried rose petals.

muhammara

At a dinner at Mamnoon, a great new Middle Eastern restaurant in Seattle, I recently discovered that one of my apéritif staples, a red bell pepper and walnut dip, is pretty close to what is known in the Middle East as Muhammara, a red bell pepper caviar with walnut and pomegranate molasses. I immediately felt the urge to reproduce its complex flavor at home. This sweet and spicy dip of Syrian origin deserves a good place on your mezze tray, next to the more well-known hummus and baba ganoush. But be careful with the pomegranate molasses: It does not take much for its tangy taste to trigger the sweetness of the red bell peppers and the slight bitterness of the walnuts.

roasted bell peppers

Don’t make the same mistake we did. Don’t order your molasses online. Instead, buy it at a Middle Eastern grocery store. It will be cheaper and you won’t have to stock 6 bottles of it (not that I won’t use them, but space is rather precious in our apartment). You can also easily make it by boiling down a cup of pomegranate juice on low heat until it is reduced and thick enough to coat a spoon.

Considering the quantity of pomegranate molasses we have, I can see a lot of Lebanese inspired recipes in my future, and possibly in yours. Expect this ingredient to return often on deuxdilettantes.

walnuts

There are as many recipes as cooks in the Middle East. I found mine in The New York Times and I barely changed it. You can easily make it gluten-free by removing the bread crumbs. In that case, make sure to blot the roasted bell peppers dry with paper towels, because you won’t have the bread crumbs to absorb their excess liquid. 

Muhammara 

Adapted from The New York Times

Ingredients

Yields about 2 1/2 cups

  • 3 red bell peppers
  • 3/4 cup walnuts
  • 3/4 cup fresh bread crumbs
  • 1/2 jalapeño seeded
  • 1 small onion, finely chopped
  • 2 garlic cloves, minced
  • 1 tablespoon pomegranate molasses
  • 1 tablespoon lemon juice
  • 1 teaspoon ground cumin
  • Salt and pepper
  • 2 tablespoons olive oil

Preheat the broiler of your oven and roast your red bell peppers for 15 to 20 minutes, turning them 2 to 3 times while cooking, until they are almost completely blackened. Let cool.

Meanwhile, toast the walnuts in a dry skillet over medium heat for about 5 minutes, until they are fragrant and lightly browned, shaking frequently. Roasting the walnuts will enhance their nutty notes while bringing out a hint of bitterness.

When the peppers are cool enough to handle, peel their skin off. Remove membranes and seeds and blot dry with paper towels.

Transfer to a food processor, along with the walnuts, bread crumbs, jalapeño pepper, onion, garlic, pomegranate molasses, lemon juice, cumin, and salt and pepper to taste. Process until smooth, stopping to scrape down the sides if necessary.

With the machine running, slowly pour in olive oil and process until combined. Taste, and adjust seasoning if necessary.

If you want to be traditional, serve your muhammara with pita bread, but it’s also good spread on fresh bread or for dipping raw vegetables.

Bee

zesty lemon curd

bowl of lemonsHave you ever wondered how lemons got such a bad wrap? And for how long have lemons been associated with someone being the recipient of misfortune? Apparently, since 1915 when writer Elbert Hubbard published an obituary for Marshall P. Wilder. Hubbard wrote that Wilder had “picked up the lemons that Fate had sent to him and started a lemonade-stand.”

Frankly, I think the gentleman didn’t know very much about lemons. If Fate suddenly dropped a bag of Meyer lemons on my doorstep – I would leap with joy. Better yet, deliver the whole darn tree. Oh the possibilities! Baking, preserving, cooking, juicing, dehydrating, candying… But first I would proudly display them on my counter as a lovely, fragrant centerpiece. Then, as they soften, I would slice a few for grilled fish or halve them for roasting a chicken. I could zest one for apple pie. And If I’m not feeling well, I would heed my mother’s advice to drink tea with honey and lemon. Oh and with summer approaching soon… how about making lemon sorbet or adding to a Pimm’s cocktail? I’m counting down the days!

Today, let us indulge in lemon curd. Sweet, zesty lemon curd. It’s surprisingly simple to make and the list of ingredients is likely stuff you already have on hand. All you need is for Fate to deliver Meyer lemons to your doorstep. Fingers crossed!

lemon curd ingredients

zesty lemon curd

yields about two 8 oz jars

Ingredients

  • 5 small Meyer lemons
    – grated zest from 5 lemons
    – juice from 4 lemons
  • heaping 3/4 cup baking sugar
  • 5 large eggs
  • 1/2 stick butter cut into pieces

This recipe moves pretty quickly once you get going so I highly recommend that you have everything prepped.

Bring water to a roaring boil in a large saucepan.

In a small saucepan, crack in the eggs and add the sugar and juice from lemons. Suspend the small saucepan over the large saucepan of boiling water. Whisk rapidly until blended. Continue to stir or whisk mixture (constantly to ensure curd doesn’t scramble) for about 10-12 minutes. The mixture will thicken.

Remove the curd from heat and push into a bowl through a fine mesh sieve.

Stir in the pieces of butter and mix until melted. Add lemon zest and let the mixture cool and thicken. zest

Once the curd has cooled, spoon into clean, sterilized jars. Cover and refrigerate for up to one week (if it lasts that long).

giftsIt makes for a lovely treat on brioche in the morning, a zesty afternoon nibble on madeleines or a decadent topper on vanilla gelato. Morning, noon, or night, lemon curd will delight.

Enjoy!
XOXO, Em

tea time is madeleine time

Earl grey madeleines

Growing up in France, my favorite moment of the day was without any doubt le goûter, a late afternoon treat celebrating the end of the school day. If I was lucky, my mother would be waiting for me with a chausson aux pommes (sort of an apple turnover) from the bakery that I would enjoy on the way back home. More regularly, it would be fruits and a couple of cookies, or just a piece of baguette with Nutella or 4 squares of chocolate, not one more — just enough to satisfy my craving without spoiling my dinner. This shouldn’t be confused with snacking. People don’t snack in France. Le goûter is a light refined meal, enjoyed between the lunch at 1 p.m. and the dinner at 8 p.m.

It would be a mistake to think that this sweet habit disappeared as I reached adulthood, but it has definitely become rarer. It’s not easy to run to the bakery when you’re stuck in a meeting. And if I can kick off early, I generally take it as a sign for happy hour. Maybe that’s the American equivalent.

madeleines

But my parents, now retired, still take a break around 4 p.m. to enjoy some tea with typical French cookies such as petits beurre, financiers or madeleines and a square of dark chocolate. And because goûter does not sounds sophisticated enough, they call it l’heure du thé, or tea time. 

With their soft, buttery and delicate texture, madeleines are the perfect treat for tea time, even more if they’re flavored with earl grey tea leaves or matcha powder. I also made a batch of lemon and lavender ones, but it’s only because lavender makes everything so perfect (also true for cardamom).

Don’t let yourself be fooled by their unpretentious look. Under their slightly crispy scalloped shell, they hide a moist and tender cake-like consistency. They should hold together and not disintegrate when dunked into a cup of tea.

earl grey madeleines

Making madeleines requires some technique and intimate knowledge of your oven. Why do you think most food blogs depict them upside-down? It’s because there is no distinctive hump to be seen. Yet the hump is the most important part, and not only for aesthetic reasons. That’s where all the fluffiness is! As a kid, I used to bite into the hump first, happy to deliver my little madeleine from its heavy burden. I would then fill the hole with a teaspoon of jam. Don’t judge me.

matcha madeleine

Now, let me share with you the secret for a perfectly bumpy madeleine, and it has nothing to do with saturating your batter with baking powder. The secret is to create a thermal shock by first chilling your batter and then, while they’re baking, making a couple of precise temperature adjustments. The result? Let’s say a picture is worth a thousand words…

hump

I know that a lot of recipes call for brown butter, but after experimenting for a while, I found that using softened butter instead allows for a lighter texture. If, on the other hand, you prefer your madeleines denser, use melted butter cooled to room temperature.

Earl Grey madeleines

yields about 2 dozen madeleines

Ingredients

  • 3 tablespoons earl gray tea leaves
  • 2/3 cup (130 g) caster sugar
  • 3 eggs at room temperature
  • 2 tablespoons liquid honey
  • 1 1/4 cup (150 g) flour
  • 1 pinch of salt
  • 1 teaspoon baking powder
  • 8 tablespoons (125 g) softened butter

In a mortar, grind the tea leaves into a fine powder. Combine with the sugar and, using your fingertips, rub until the sugar is fragrant. 

In a bowl, beat eggs and flavored sugar with an electric mixer. Gradually add honey and whisk until the mixture is pale, thickens and doubles in volume — about 5 minutes.

Gradually add the flour, salt and baking powder and beat until the mixture is homogeneous. Finally, incorporate the softened butter. Cover the batter with plastic wrap, pressing the wrap against the surface to create an airtight seal and chill for at least 2 hours. This will allow the gluten to relax and give a light texture to your madeleines.

Preheat your oven to 460°F. Line the molds with butter and a dusting of flour. Don’t fill the mold with too much batter; a tablespoon will be enough. Also, don’t worry about spreading the batter evenly as the heat of the oven will take care of that. For even better results, you can chill the mold and the batter for 10 minutes in your fridge before baking them.

Bake for about 2 to 3 minutes, until you see a small depression, then reduce the temperature of the oven to 390°F. Cook for an additional 4 minutes (the hump should start to form), then reduce to 350°F and cook for another 4 to 5 minutes, until the madeleines are golden and well rounded. In the end, your madeleines will cook between 10 and 12 minutes.

Unmold immediately and let cool on a rack.

madeleines tray

Make sure that for each new batch the pan is cool and properly buttered and floured.

They’re best eaten slightly warm, direct from the oven and cooled for a few minutes. But you can store them for a couple of days in an airtight container.

For matcha madeleines: use 7g of matcha powder.

Incorporate the matcha powder with the flour.

matcha powder

For lemon lavender madeleines: use 1 tablespoon of dried lavender buds and the zest of 1 Meyer lemon. You can also add a little bit of the lemon juice to the batter.

Rub the sugar, lavender buds and lemon zest together with your fingertips until the sugar is moist and fragrant.

lemon lavender sugar

I can’t tell which version was my favorite. I guess it would be like asking me to choose among my children. I knew from the beginning that the lavender lemon woud be a hit because, you know, it’s lavender. Nothing can ever go wrong with lavender! As for the Earl Grey ones, their subtle citrus flavor will pair very well with your cup of tea (which may or may not be Earl Grey). You’re all set for a perfect screening of Downton Abbey!

But I was surprised by the taste of the matcha madeleines. Although I’m a big fan of matcha, it’s true that its earthy and slightly bitter taste can be overpowering. The quantity in the recipe is just enough for adding a subtle tang that will nicely counterbalance the sweetness of the madeleines. I’m already addicted!

Bee