let’s get crafty… DIY hairclips

hairclips final product

While my husband and I have been attending weddings like weekend warriors – it’s been difficult to justify experiments in the kitchen. Yes, I’m human and can only dance off so many calories (and those bridesmaid dresses are never forgiving are they!?) Truly, it’s a bit necessary give the baking and ice-cream trials a rest.

Combine the wedding eating and drinking extravaganza with the baby bonanza that is erupting among the other half of my friends/family and we have a necessary project. Yes folks, it’s summertime and therefore, appropriate to bring us all back to our summer camp days. Gather ’round the picnic table – we are about to get crafty.

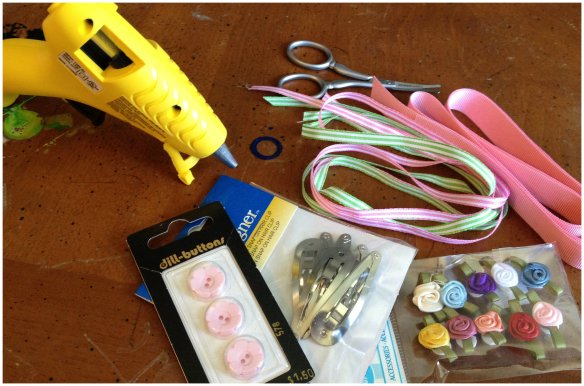
I had an idea of what I wanted to make for all the sweet baby girls that are about to arrive into the world (hair-clips!!) but I didn’t have any of the items necessary. So, I strolled over to the local fabric store, Stitches. They have a fabulous assortment of supplies and I purchased a small amount of ribbons, hair-clips and a few add-ons for about $6. Yes, you read that correct. $6!!! When does anything (let alone anything for a baby girl) cost $6? Almost never.

supplies hairclip project

The rest was easy and fun. I decided to cozy up to our “crafts” table (the table that my husband used as a child to paint his model airplanes), in the event that the project became messy. I plugged in my cheap-o glue gun, found a pair of sharp scissors and got to work.

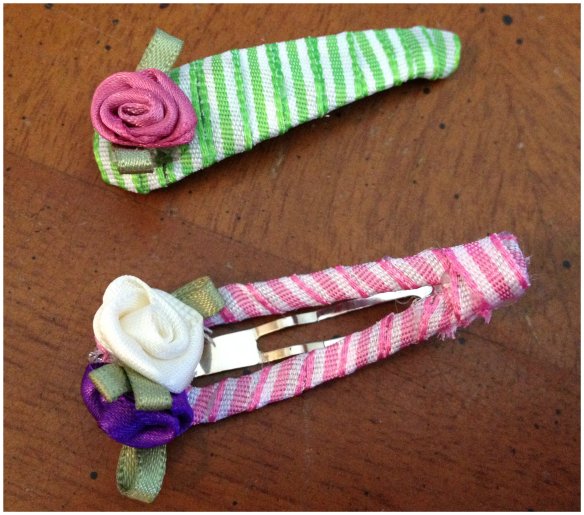
First, add a tiny dab of glue to the bottom of the tip of the hair-clip. Then, start to wrap the hair-clip with ribbon. Feel free to do a “practice wrap” before you commit to adding glue. Once you feel comfortable moving along, remember that it’s a good idea to add a bit of hot glue as you go. Stick to a system – ie. add a dab of glue on the bottom of the clip every time you wrap the ribbon around. This way the ribbon is secure along the metal clip. If you don’t add the hot glue as you go, the ribbon may slip and slide over time and the silver metal will be exposed.Collage 1 hairclipsCollage 2 hairclipsThat was easy, huh?

I’m pretty sure it took all of 5 minutes. So I made a second one. With pink, of course!
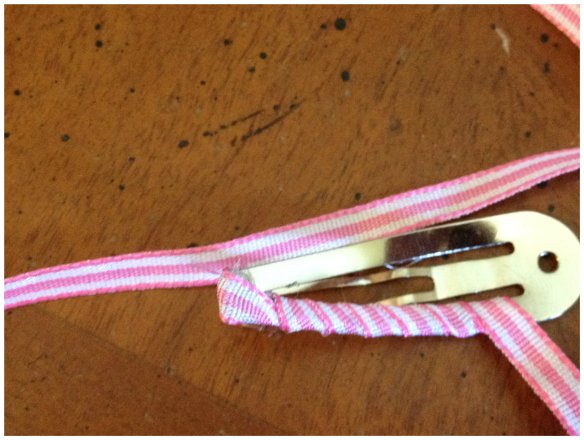
pink hairclipIt’s so simple (and cheap) and truly a thoughtful gift. As you know, I’m always a fan of a homemade gift. And I’m already dreaming up ideas for other barrettes and hairbands that would be super sweet. Big, poofy ribbon roses or sweet pink heart barrettes or we could go in an entirely different direction of whale ribbons for a preppy east coast nautical theme… the possibilities are endless!!!

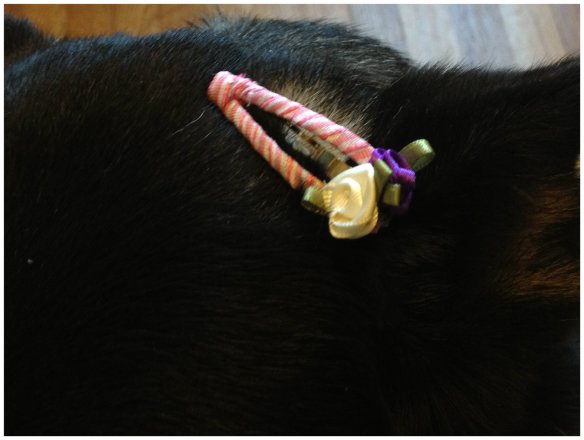
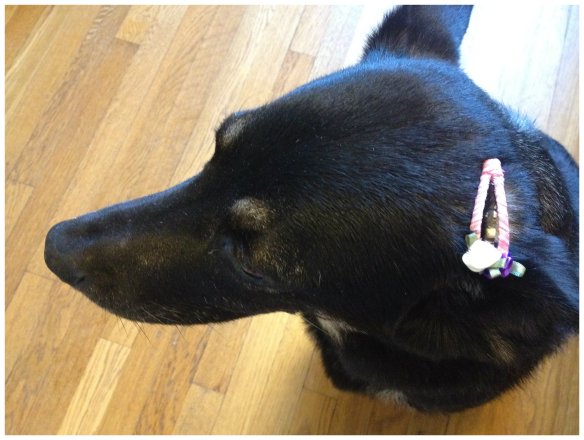
Since I don’t have a little girl – I had my Lucy dog model the hair-clip. She stayed still just long enough for me to snap a picture. Pretty cute, huh?lucy modellucy modelI think so too!
Good luck and happy crafting!

XOXO, Em

currently crushing on… the ombré effect

flower bannerI am not a trend setter. In fact, by the time I’ve managed to clamber onto the wagon, everyone else has bailed. I’m left in the dust only to see them ride off, whooshing past me, waving from the newer, sexier wagon. Sigh.

When the ombré trend started I was completely uninterested. I don’t fuss with my hair and when it comes to fashion I’m conservative and wear mostly black. And I certainly don’t wear shades that fade from one color to another. It’s not symmetrical. But slowly ombré has managed to creep it’s way into everything… cakes, nails, shoes… everywhere but into my closet.

Flash back to about a month ago when I was walking with my dog, Lucille, and came face to flower (it’s really tall) with a fire poker or torch lily.

fire poker

It was bright and cheerful so I snapped a picture and for about a week and a half, I specifically routed our daily afternoon walks by the patch of fire pokers. I admired their lovely colors, gently flowing from soft pale yellow to orange to almost a burnt red. I had to admit it to myself: I, naysayer of ombré, was totally agog for this nature produced ombré flower.

So I set out to do what anyone who is passionate about flowers would do. I scouted the local flower shops to create an ombré inspired centerpiece. I bounced between four different flower shops, took pictures and returned home to review the flowers and piece together the ombré effect. Initially, I wanted to transition from the faintest cream to the loveliest spring green but I couldn’t find the right flowers/greenery. The color trends at the local shops were purples and pinks. How typical, right? I was slightly disappointed but reasoned with myself that inspiration can not be forced. Putting my disappointment aside I set off to the market to pick up ingredients for the evening dinner and stumbled across these little gems…

end of hueThey were perfect! Just the right hue of deep purple to complement an ombré of pinks or purples and they were anything but the norm. Feeling renewed joy in my project I practically ran to the flower shops the following day and rounded up a glorious assortment of flowers.

Here is what I ended up with: ranunculus (with the just a flirt of color), fancy liliac, snap dragon, stock, allium globemaster, liliac, alstromeria, and deep purple baby artichokes.

in a row

Prep containers. Start snipping stems. Test height as you go.

Work

Sometimes the pictures say it all…

table ombre

flowers in caddy

Bonus on the containers: They are actually part of a wine cup caddy set. When you are not displaying fabulous flowers you can pack a picnic with a bottle of wine and tote this marvelous drinker set. I bought mine at Butter Home.

ombre in grass

As I write this post my original inspiration is fading away until next season… the patch of fire pokers is drying up and it’s looking a bit blah. I miss it already.fire poker end season

Surprisingly, while I was (shopping but not really shopping) on the J.Crew website, I noticed they have an ombré cashmere sweater that you can pre-order… so maybe the ombré trend isn’t as fleeting as I originally thought.

Does that mean that ombré will soon be in my closet? Likely not. But I’m thrilled to have it on my kitchen table as a centerpiece. So, what’s next for the oh-so-trendy? I hear cropped shirts are all the rage (again). But that is so not happening. Maybe I’ll rock a high-low!

Have a fabulously trendy weekend and keep on crushing on! XXOO, Em

say “i do” to DIY wedding flowers

bouquet1Yep, we made that and so can you. Isn’t it so romantic? Wedding season is upon us and I can’t wait.

If you’ve ever thought about arranging your own wedding flowers but are intimidated by what seems to be an enormous task (on top of the entire task of planning a wedding) we want to assure you that with enlisting help (hello bridesmaids!) and having realistic expectations (we’ll help you with that), you can create your own bridal flowers.

flowersWe recently had the opportunity to chat with Muriel-Marguerite Foucher of Paris Eastside at one of her recent wine tastings. The three of us discussed the idea of joining forces to teach monthly DIY flower arranging classes. We all love arranging flowers and Muriel has the perfect space to teach classes. It seemed like a natural fit.

While discussing the flowers for the bouquets Bee asked, “Well, what exactly are you looking for?” I didn’t have a good answer. I told her that I would know it when I saw it. Every bouquet starts with inspiration somewhere… you just have to find it.

So we walked over to Pike Place Flowers, the little flower shop near the market. Eureka! I found roses that were pale pink with a lavender, silver hue. So soft, almost antique-y and with an enchanting perfume. This flower was spotlight worthy. I had found my star, my inspiration. Now I needed the rest of the bouquet.

roses

On the way home I picked off a bit of white heather, from a large shrubbery. It had the most lovely drape to it and I couldn’t resist. I had been looking for seeded eucalyptus but couldn’t find any at the flower shops. This would have to do. The goodies: loose flowersBee was pretty excited but also a little nervous about arranging her own bouquet. I decided to take her under my wing as my first student and gave her pointers as we went along. I think her final project deserves an A+.
bouquet2

conversation level bouquet

If this looks like something that you’d like to learn how to make, join us as we team up with Muriel at Paris Eastside for a two-hour class on April 6th. You will learn fundamental techniques, including how to make floral foam arrangements and hand-held bouquets while staying on a budget. We will also provide you with local sources for purchasing flowers as well as tips and tricks to care for your bouquets. This is your opportunity to learn and brainstorm with the pros in a fun and friendly environment! At the end of the class, you’ll come back home with a simple yet professional and elegant conversation-level arrangement and a bridal bouquet. Bring your friends and make it a girls’ day out — and don’t forget your bridesmaids so they can support you and help you prep for your big day. Check Paris Eastside for registration and other details.

bouquet3We hope to see you on Saturday, April 6th @ 11am! Happy wedding planning!

XOXO, Em

how to make paper flowers – the perfect brain-killer

flower on blue background

I don’t know about you, but sometimes I need to disconnect from everything. Watching TV or reading does not quite do it for me. There is always a little something that brings me back to my life, makes me think about my to-do list. It does not appease me or bring me to the state of mental comfort I’m looking for. In those moments, when I just need complete disconnection, I usually take a walk. But Seattle weather being what it is, walking involves being indifferent to the elements, and I’m not. I do care about the rain and the wind, and if I just had a blowout, there is no way I’m going to step outside. (I’ve gotten much better: I actually don’t blow dry my hair that often anymore. But this post is not about my hair, right?) Anyway, whenever I can’t take my beloved walk, I turn to arts and crafts. There is something very relaxing about intensively focusing on a craft project. It completely relieves me from the stress of my day and converts it into creative energy.

Kusudama flowers

I’ve been recently inspired by the beautiful paper flowers on display at West Elm. (Have you ever been in that shop? I could buy everything.) Those flowers were so pretty and delicate. I’m sort of an origami geek — I enjoy choosing washi paper and folding it into creative designs — so I thought I’d try to recreate them. This year, I even decorated our rosemary-plant-slash-Christmas-tree with golden paper cranes. Plus, non-floral bouquets will give a nice, original touch to your interior and, the best advantage, the flowers won’t wilt. They don’t need to be watered or trimmed. I’m not like Em; I’m just awful with my plants. I’m a plant serial killer and I know it.

bouquet

Let’s start with the classic but beautiful Kusudama flower. Choose some pretty origami paper. For each flower, you will need 5 paper squares of identical size to make the 5 petals. I personally chose to divide 5 7/8″ squares into 4 smaller ones in order to make small paper flowers. Don’t hesitate to combine different patterned paper to make your flowers.

squares

Lay your piece of paper on a flat surface. If the pattern is only on one side, place the patterned side down on the table. Start by folding the bottom corner to the top to make a triangle. Remember, when you fold, always crease very firmly, using the tip of your nails.

origami1

Then, fold the left and right corners up to the middle corner to make a diamond shape.

origami2

Fold the same points down. The folded edge will line up exactly on top of the outside edge of the square.

origami3

Open up the flaps you have just created and flatten the middle fold to create what should look like two little kites on top of your initial diamond. Do you feel relaxed now?

origami4

Fold the top triangles down into the fold and crease to level them with the edges of the paper.

origami5

Fold the outer edges back using the crease you made earlier and bring the two outside triangles together, in the middle, creating a loop representing a petal.

origami6

Glue the outside triangles together and maintain pressure using a paper clip or hairpin while it dries. Make 4 more of these petals and glue them all together.

Folding, creasing. Folding, creasing. Folding, creasing…

Take your time. Always wait for the glue to be dry before gluing on another petal.

Origami flower

And because a video is worth a thousand words, here is a demonstration of how to make one petal of a flower.

Now let’s be honest: although it’s very enjoyable, this is a time-consuming activity, a true labour of love. So don’t feel compelled to make a bouquet on the first try. Make one flower at a time and then go back to your normal life to avoid turning into an origami nerd like me.

Eventually, you’ll have enough for a floral arrangement. Just find some cotton branches at your local florist and glue your flowers onto the ends.

Branches

Happy folding!

♥ cute DIY cards for your valentine ♥

all_cardsWe know what you are thinking… WHO HAS TIME TO MAKE A VALENTINE’S DAY CARD?! Ummm. We do. And so do you! These cards are so easy and require little time and just a few materials.

What you’ll need:
♥ good quality paper/card stock
♥ stamps / ink pads
♥ watercolor paint set
♥ scissors
♥ X-Acto knife / blade
♥ glitter (yes! you know you love glitter)
♥ Elmer’s school glue
♥ a nice pen
♥ a pencil
♥ ribbons
♥ what ever else you can rummage up

Bee is a bit more artistic than I so she tried out her hand with the paint set. She also feels comfortable using the X-Acto knife. Yikes. That’s not really my thing. I’m more of a stamp-glitter-ribbon kind-of-girl. And that is totally okay. Remember, a Valentine is a note of your affection and it’s from the heart. When it’s homemade, it’s so much sweeter.

Below, you find a few of our ideas. Maybe they’ll inspire you to nix the mass produced greeting cards. Go ahead, break out the sparkles, craft up some cupids, and wax poetic.

Cut-outs (difficult + easy):
Bee tried out a few different techniques with cut-out cards. I think they are both really super. I also love that she is catering to two different skill levels. The first option highlights ideas from Ashley Pahl Design, featured in I ♥ Stationary. You’ll need an X-Acto knife for the precise cut-outs. It is a bit tricky at first but Bee said once she got going, the process moved along quickly. Simply trace / draw your pattern in pencil and shade in the area that you plan to cut out. With the X-Acto knife, remove the shaded area. Glue red or pink (or whatever color you wish) on the bottom half of the inside of the card. Voila!

cut_out_cards

Perhaps you like the idea of the cut-out card but your skill level is more beginner. This classic candy heart cut-out is so sweet and simple. Same process, less detail.
simple_cut_out

Stamps:
I love stamps. They are quick, super easy, and reusable for years. For the background on both cards I simply used a damp sponge to apply red ink. On one card I stamped on a simple Valentine greeting and hearts. This took all of 30 seconds. You can do this! However, the repeated love phrases required a bit more of my time and my concentration. If you have a nice black pen and a few love phrases to repeat, you are set.
stamps

Sparkles:
Glue + Glitter = heaven. Any excuse is a good excuse to get messy with glitter. This sparkle card shines bright.
big_sparkling_cardWatercolor:
The mini hearts are melting my heart. Bee said that she practiced her penmanship with the brush before she committed it to card stock. Looks like she nailed it! I might suggest a ruler to guide you along the card. Make sure your watercolor isn’t water logged or your lovely message / design will drip as you let it dry.

watercolor_cards

Online:
Maybe you’re new to this DIY concept and at this point – overwhelmed. First, take a deep breath. Second, visit Tagul and create your Valentine’s Day card in moments with just a few clicks.

sparkling_cardNo matter how you craft your card, it’s made with love. Well done.

Happy Valentine’s Day!
X❤X❤X❤, Em