the essential northwest pie: blueberry and peach

lavender peach blueberry pie

The Northwest is home to many delicious fruits. Every summer we’re blessed with abundant yields of locally grown fruits, including peaches and blueberries. (Georgia may be the Peach State, but we hold our own here in Washington.) We are now entering the peak peach season, when it’s easy to find premium-quality fruits, even at the supermarket.

Last September, one of my husband’s colleagues gave us about 10 pounds of ripe golden peaches that he had just picked in an orchard. Those were the best peaches I had ever had: fresh, juicy and so intensively flavorful. The only inconvenience? The fruits don’t keep very long in the hot summer weather. So we took to canning — heating up our already warm kitchen filling jar after jar with peach jam and peach salsa.

peach & blueberry pie

Peach and blueberry is one of my favorite fruit combinations: The two flavors greatly complement each other, and the fruits look great together. Somehow, they just capture the fragrance and feel of summer. My go-to breakfast is a handful of blueberries, a sliced peach and a spoon of cottage cheese. Sprinkle some crushed walnuts on top and enjoy! I’m also a big fan of blueberry peach crumbles, pancakes, cobblers… But surprisingly enough, I had never made a pie. It was high time to give it a try. Nothing celebrates summer as much as a fruit pie.

fruits pie

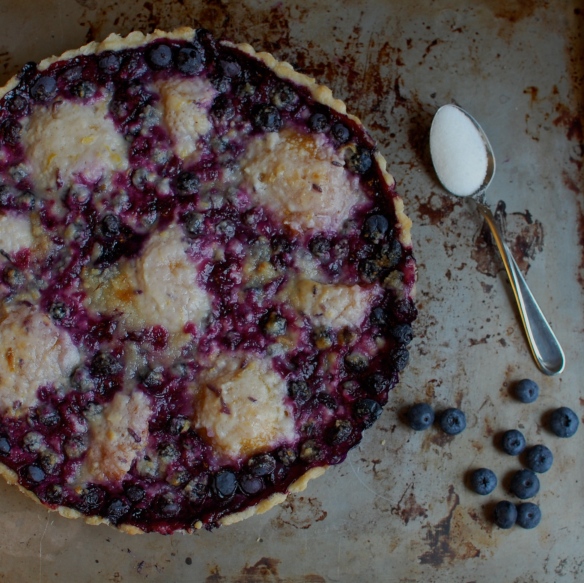
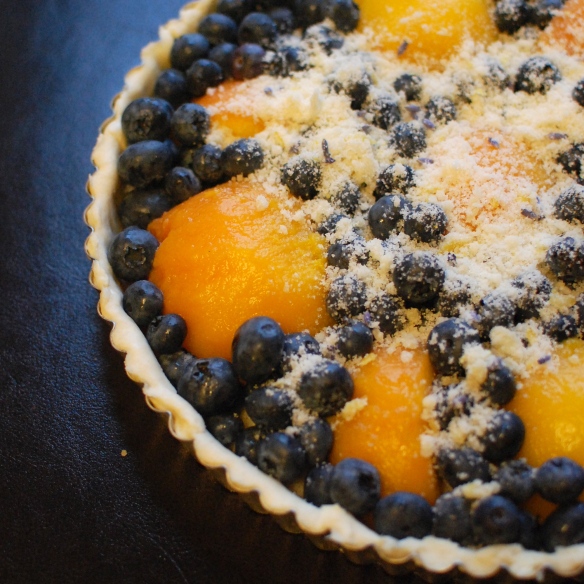
A pie, yes, but with a twist: No double crust for my pie. I had something more subtle and delicate in mind, something that would enhance the flavors of the fruits rather than overpower them with a buttery crust: a crumb streusel with lemon zest and lavender buds (from my harvest session in Sequim few weeks ago). Just enough to add some layers to the taste of the pie without detracting from the sweetness of the peaches and the floral perfume of the blueberries. A true Northwestern pie with locally grown peaches, blueberries and lavender. All the flavors get a chance to shine and it makes a beautifully perfumed combination.

uncooked pie

The key to a delicious pie depends on the quality of the fruits you use — ripe but not too soft, sweet with a balanced tanginess — as much as on the consistency of the crust: Never settle for anything less than light and flaky. In a previous attempt, this pie gave me some trouble with the crust being too soggy and the blueberries turning into a soup. I finally nailed it after choosing to pre-bake my crust and add a little cornstarch to the blueberries to thicken their juices. (Note to self: Shortcuts are never good when baking.)

fruits pie with crumb topping

As for the final product, it’s definitely a keeper. The crust is nicely flaky and lemony, the crumb topping is light and airy which really allows the fruits to shine. This must be the taste of sunshine.

Blueberry, peach and lavender pie

yields one 9-inch pie

Ingredients

For the crust (with a zing)

  • 1/2 cup water
  • 1 3/4 cups all-purpose flour
  • 2 teaspoons sugar
  • a pinch table salt
  • 1 teaspoon finely chopped lemon zest
  • 1 stick unsalted butter, very cold and diced

For the filling and crumb topping

  • 4 tablespoons flour
  • 1/2 to 2/3 cup sugar (depending on the sweetness of the fruits)
  • 2 teaspoons lemon zest
  • 1 tablespoon lavender buds
  • 2 tablespoons unsalted butter, diced
  • 3 ripe peaches
  • 1 cup of fresh blueberries
  • 2 tablespoons cornstarch
  • 2 tablespoons lemon juice

For the lemony crust

Pour the water in a cup and add a few ice cubes. Keep aside. In a large bowl, combine flour, sugar, salt and lemon zest. Add the dices of very cold butter and, using a pastry blender (or your fingers), work the mixture for few minutes, redistributing it as you go so that everything is worked more or less evenly. Stop when the butter pieces are the size of small peas. Don’t worry if there are still some bigger chunks of butter. You actually want them to improve the flakiness of your crust.

Drizzle about 1/4 cup of cold water over the mixture and gather the dough together with a spatula. Add more water if necessary, one tablespoon at a time. Transfer dough to a lightly floured work surface and knead it gently. Wrap in plastic and chill dough in the fridge for at least one hour (and up to two days).

Butter and flour your pie tin. Roll dough on a lightly floured surface and transfer to pie tin, gently pressing dough onto bottom and sides up of the dish. Pierce the bottom of the crust with a fork and place in the fridge until firm, at least 30 minutes. Trust me, the colder the better. It will help the crust keeps its shape and size while baking.

Preheat the oven to 375°F. Line crust with foil or parchment paper and fill with pie weights (or rice). Place the pie tin in the middle of the oven, on a baking sheet and bake until crust is set, about 20 minutes. Carefully remove parchment and pie weights and put the crust back in the oven for another 12 minutes, until crust is pale golden. Transfer to a wire rack and let cool.

For the filling and crumb topping

Mix together flour, sugar, lemon zest and lavender buds in a small bowl. Using the pastry blender (or your fingers), cut in the butter until the mixture resembles a coarse meal. Set aside.

To peel the peaches, bring a large pot of water to a boil and prepare a large bowl of ice water. Using a sharp knife, cut a small “X” through the skin at the base of each peach. Put the peaches in the boiling water and blanch them for about 40 seconds. Transfer the blanched peaches to the bowl of ice water with a slotted spoon. Let them cool for about 1 minute and then drain the peaches and pat them dry. The skin should easily pull away. Halve the peaches, remove the pits and set aside.

Toss gently blueberries and cornstarch in a small bowl and set aside.

Sprinkle a third to half of the crumbs in the bottom of the pie shell (to absorb the juices). Place the peach halves face-down in the crust and spread the blueberry mixture between them. Drizzle with lemon juice and cover with the remaining crumb topping.

Bake at 375°F for about 30 minutes, until the crust is golden brown and the blueberries are bubbling. Let cool before serving. The crust will be crispy and the filling should not run. Sometimes perfection is as simple as a pie.

One last thing: Do you remember the Presidents of the United States of America (which apparently is a band from Seattle)? Yes?… No?… Well, let me refresh your memory: “Millions of peaches, peaches for me“… It has become just impossible for me to think about peaches without having this song stuck in my head (thanks to the hubby for introducing me to such a monument of American music). I thought I should share it with you. You’re welcome!

Bee

the perfect cheese board

Cheese plate

I might be a living cliché but I love cheese. Shocking, isn’t it? A French girl who likes cheese. But it’s true, and I could do an entire meal with only cheese and bread — and wine, of course. I grew up in a family where cheese was valued and where there would never be less than 4 different sorts on the table. Raw-milk was a rule (and I never got sick; I actually think it helped strengthen my immune system).

So try to imagine my fear when I moved to the U.S., the country where it’s possibly easier to buy a gun than real French cheese! At least, that’s what I would have thought from looking at the cheese selection in most supermarkets here. But I was actually surprised to discover that Washington state is home to dozens of artisan cheese makers who use raw milk and that even in the U.S. it’s possible to find unpasteurized cheeses (as long as they’ve been aged for 60 days).

French cheeses

I know that here cheese is generally thought as an appetizer, but in France, cheese is traditionally served between the entree and the dessert — why choose between cheese and dessert when you can have both? It might seem like overdoing it, especially seen from the perspective of health-conscious America, but that’s what has been identified as the French paradox: French people have a relatively low incidence of coronary heart disease, despite having a diet relatively rich in saturated fats. Basically, we’re a a nation of butter lovers and cheese eaters who don’t get fat. (Life is unfair, I know.) To be honest, I think it has a lot to do with portion control, self-discipline and avoiding processed food, but that’s another story.

Cheese overload

Creating a cheese platter can be intimidating. Which sorts to choose among all the amazing possibilities? (And believe me, I know about cheese overload: I come from the country where there are more cheeses than there are days in a year.) Here are some tips which I hope will help you to create a delicious platter of cheese.

Be a mixologist! Your aim should be to propose a balanced, complementary range of cheeses. No hard rules but try to mix different textures (soft, semi-soft, soft-ripened, washed-rind, hard, semi-hard, blue), milks (cow, goat, sheep) and flavors (mild to strong). Have enough variety to accommodate all palate types. A good rule of thumb would be: “something old, something new, something stinky and something blue”.

Make it pinteresting! Label your cheese so that your guest know what they are eating: use chalk on a slate board, write on a sheet of brown paper or use a label attached to a toothpick. And if you’re going international, you could even create little flags to indicate the country each cheese is from.

Franco-American cheese plate

Clockwise from the top left: Roquefort, Délices de Bourgogne, Cypress Grove Umboldt Fog, aged gouda, Comté.

Another tip is to think about a theme: How about an Italian cheese plate with antipasti? Or try a “cheese flight” by proposing cheeses within the same category to discover the nuances that differentiate them.

Practice good cheesiquette! Serve the cheeses at room temperature. Take them out of the fridge an hour before serving which will help the flavors and texture to reach their full potential. Unwrap them from their packaging just before serving to prevent them from drying out.

Cheese sample

French cheese plate. Clockwise from the top left: Petit Basque, Comté, Roquefort, Boursin, Pavé d’Affinois.

It is traditionally recommended to arrange your plate so that cheeses are displayed clockwise from the milder to the stronger. I tend to follow my own instincts and associate them by shapes or colors, depending on my very subjective desires.

Cut the first slice of each cheese so that your guests don’t feel intimidated. Cut round and square cheeses in wedges, and rectangular ones into slices. Each cheese should have its own knife.

Befriend your cheesemonger. Have a good relationship with your cheesemonger. They can do wonders and will be happy to advise you and let you sample! Some places where I’ve found a good variety of cheese: Trader Joe’s and Murray’s. If you happen to live in an area where you can find good local cheeses, try to incorporate them. Farmer’s markets are often a good place to discover them. In Seattle, we’re lucky to have local creameries such as Beecher’s and Port Townsend Creamery, specialty stores like DeLaurenti, Big John’s pfi and the Calf & Kid, and all those amazing farmer’s markets. 

Pick your pairings. Again, there is no “rule”, but here are some guidelines to make the most of your wine and cheese. An easy way is to let the “terroir” speak by serving wine and cheeses from the same region. 

Wine bottles

I know it might seem counterintuitive, and for some even blasphemous, but white wines are usually easier to pair with cheeses than red wines. Try to pick a fruity or buttery white wine with limited acidity, like a Sauvignon Blanc or a Riesling, but avoid Chardonnay (its oaky taste often overpowers the taste of the cheese). If you’re going red, the lighter and fruiter the wine, the easier it is to find a match. Try to pair a Sangiovese with mozzarella or provolone or a Rioja with havarti. Aged cheeses go generally well with older, earthier and more tannic red wines such as Zinfandel, Syrah or Merlot, and light cheeses with light wine: Fresh goat cheese is delicious with a glass of Sancerre or Pinot Gris. Finally, don’t forget dessert wines with your cheese; they make fantastic companions! Enjoy your brie with Muscat, a sharp cheddar with Gewürztraminer or Stilton with Port wine. If you’re feeling lost, Murray’s has a good pairing section on their site.

Nibbles, nibbles, nibbles… It’s a good idea to offer some accompaniments alongside your cheese, but don’t forget that cheese is the star of the show here. You don’t want to overpower it with stronger flavors. Instead, find tidbits that will enhance its aroma.

Olives

Don’t hesitate to mix sweet and savory: quince paste, jams and chutneys, olives, nuts, marcona almonds, pickles, cornichons, mustard, fennel seeds, fresh fruits (pears, apples, figs, grapes) and dried ones (apricots, dates and figs). In Belgium, when you order some gouda in a café, it is usually served with mustard and celery seeds and makes for the perfect snack. Ossau-Iraty, a cheese made with sheep’s milk from northern Basque country (and one of my all-time favorites), is traditionally eaten with some local black cherry jam.

Breads

Offer various kinds of bread: poilâne, walnut bread, rye bread, baguette slices… but if you don’t want your guest to get full too quickly, also propose some crackers. Macrina and Beecher’s have some really good ones (Beecher’s honey hazelnut crackers are delicious). Remember, pressed cheeses don’t really need bread, they’re great on their own.

Another thing that might go well alongside your cheese board is a simple salad. Prepare your vinaigrette ahead of time and toss the salad at the last minute. My mother has the most perfect vinaigrette recipe: She adds minced shallots and few drops of Maggi. No one can resist it and people generally fight to get a second helping.

Be adventurous! Try to go out of your comfort zone. It might look over the hill and smell funny but try it anyway. You might just be that close to falling in love! Same goes for the pairing: Serve blue cheese on gingersnaps or with chopped bitter chocolate. You’ll see, the combination is sublime. Remember, the stinkiest cheeses often aren’t the ones with the strongest taste.

Now you’re ready to put together your own cheese plate. Good luck, and keep in mind the secret ingredient: good company. Because the savoring of cheese is an experience to be shared.

Bee

have pie will travel

have pie will travel

Looking back to the summer vacations of my youth, I fondly recall the blistering hot days in New England when my mother and I would truck over to the u-pick berry farm and fill our bellies and pails with as many blueberries possible.  Most of the time the berries brought home were consumed by the handful. We enjoyed their perfection as nature intended.

No one complained that the berries weren’t safely nestled in pie crust because my mom never baked pie and we didn’t really know what we were missing. Don’t get me wrong, my mother is one of the best cooks ever. Her lasagna is so good that I can’t order it anywhere else because I’ll only be disappointed. But she’s never been much of a baker. Maybe it’s a sweet or savory thing. Sure, she makes brownies and sweet breads but never pies.

I get nostalgic for those hot summer days of blueberry picking. I miss the quietness of the farm. The scorching sun. Sweat mixing with sunscreen. Dusty feet in sandals. The long stretches of silence as my mother concentrated on picking out the best berries and I concentrated on stealthly eating more berries than the number that ended up in my pail. And consequently, my mother scolding me for eating too many berries.

Sure, I could drive up to the u-pick berry farms north of Seattle. But it wouldn’t be the same. Who would advise me not to eat all those blueberries? Gosh, I might not return with any… just a belly full of berries. And lately, I’ve been busy so it’s easier to run over to the traveling farmer’s market and pick up a few pints. As July runs out of days in the month it dawned on me that most of the berries purchased have been eaten by the handful. No berries have been safely nestled in pie crust. As a person who loves to bake, this feels almost criminal!

I know – I said I’d cool it on the baking for a little while but let’s be honest here, it was only a matter of time before I broke down and returned to the kitchen. (Must. Bake. Pie.) Plus, my hubby and I were getting ready for a road trip to Bend, OR (for yet, another wedding!) and I nominated myself to take care of the sustenance. The idea of a summertime road trip just beckons for a little picnic. And what picnic could ever be complete without something sweet? This road trip would be the perfect opportunity to try out blueberry pocket pies.

They are simple to make and super portable. All you need is love… and these ingredients:

all you need

Blueberry pocket pies

Yields 6 pocket pies

Ingredients

  • 2 cups fresh blueberries
  • 1/4 cup sugar
  • 1 tablespoon fresh lemon juice
  • 1 teaspoon fresh lemon zest
  • 1/4 teaspoon kosher salt
  • pie dough – insert your favorite recipe (I use a butter and shortening dough recipe)

Pre-heat the oven to 400°.

Mix the blueberries, sugar, lemon juice, lemon zest and salt in a medium mixing bowl. To reduce trauma to the berries, simply mix by hand.

When the oven is just about done preheating, begin to roll out the dough. It was hot in my kitchen so I needed to return the dough to the refrigerator several times to keep the dough cold.

Once the dough is rolled out into a long thin sheet, divide it in half and then into thirds. Then scoop berries into each section and form into pockets.

A break down of the steps to pocket pie:

step by stepBake the little pies in the oven for 35-40 minutes.

Here is the result of my first batch:

unciviled pocket piesI thought they came out rather uncivilized so I ended up making several batches. In the end… not a single batch looked perfect. I suspect it has something to do with the fact that I kept trying to over-stuff the little squares of dough with too many berries. But oh! The taste was heavenly. The crust was buttery and crumbly and the fruit inside was sweet but not overly sweet. The blueberry flavor remained true with just a zing of lemon. At some point I told my husband that these little pies were “pie-crack.”

pies on a plateWe brought a pair of pies on the road trip to Bend. Between the piping hot coffee and the high I was riding from the pie – it’s a good thing I wasn’t driving.

I’m thinking about trying these out with sweet cherries or maybe a blueberry peach combo. Bridesmaid dresses (and any other fashion for that matter) be damned. I’m back in the kitchen baking and I’m going to enjoy the fruits of summer.

Have a super week!

XOXO, Em

goat cheese blueberry honey ice cream, philadelphia-style

goat cheese blueberry honey ice cream

Did you know that July is National Ice Cream Month? And that the third Sunday of the month is National Ice Cream Day? President Reagan called for all people of the United States to observe these events with “appropriate ceremonies and activities.” So Em and I decided to have an ice cream week. But it’s really because President Reagan wanted us to do so.

Following Em’s experimentations with the ice cream maker, I felt suddenly inspired to come up with my own flavor, and, taking advantage of Em leaving the city for the weekend, I proposed to “take care of” our new favorite kitchen item. This is I think the start of a long love story. But this love story is unfortunately doomed: Besides the fact that I have to give back the machine, my kitchen does not really have the space to welcome it. And my freezer is so small that it makes the storage of the bowl and the ice cream almost impossible. In the meantime, I’m satisfied knowing that it is available five floors up. Em does not know it yet, but her kitchen has just become an extension of mine.

blueberries

Over the weekend, I tried one recipe: goat cheese blueberry honey ice cream, aka taste-bud paradise. I know this combination might sound strange, but it’s delicious. The inspiration came from one of the best ice cream shops I’ve been to: Salt & Straw in Portland, Ore. This shop alone would be enough of a reason to visit Portland. I once tried their blue cheese pear flavor and it simply stole my heart! The hubby was not convinced, but he does not like blue cheese anyway. Not sure what’s wrong with him…

Salt & Straw

Anyway, as the good French girl that I am, I’ve always been obsessed with cheese pairing, trying all sorts of savoury sweet combinations. My latest crave: cantaloupe melon, feta and mint. Irresistible! And what’s better for dessert than some goat cheese with walnuts and a drizzle of honey? Keeping that in mind, I had a feeling that the lactic, citric tang of a mild goat cheese would pair perfectly with the tart-sweet blueberries. Add some honey (or lavender honey if you have some) for a bit of sweetness, let the machine do its trick and wait with spoon in hand (I did!).

I used Em’s egg-free base made with whole milk and cream but added some goat cheese  for a dreamy creamy texture. I really waffled on whether to add egg yolks. We all tend to think the richer the better, and it’s true that a custard-based ice cream (French-style), because of its higher fat content, will maintain a softer, creamier texture when frozen. But the fat also tends to mask the flavors of the other ingredients. The eggless version has a delicate taste and a milky smoothness and is apparently called Philadelphia-style ice cream.

Philadelphia-style ice cream

Instead of just adding whole blueberries, I cooked them in a pan to get something in between a coulis and a jam. Just to add some texture to the ice cream.

For better results, pre-chill all the ingredients overnight.

Goat cheese blueberry honey ice cream

Yields about 2 quarts.

Ingredients

  • 1 cup whole milk
  • 1 tablespoon honey (or lavender honey)
  • 1/2 cup granulated sugar
  • 4 ounces young mild goat cheese
  • 2 cups heavy cream
  • 1 pint fresh blueberries
  • 2 tablespoons water
  • 1 tablespoon honey

Combine whole milk, honey and sugar in a small sauce pan and bring to a simmer over medium-high heat. Stir to dissolve the honey and sugar.

Put the goat cheese in a large bowl, pour over the warm milk, and mix together until smooth. Incorporate the heavy cream, let cool and refrigerate overnight.

Prepare the blueberry “jam”. Place the blueberries in a saucepan over medium-low heat. Add water and honey and bring to a simmer. Let simmer for about 15 minutes until most of the liquid evaporates, occasionally mashing the mixture to the desired consistency. I personally prefer keeping some texture. Let cool and refrigerate overnight.

blueberries

The next day, pour the goat cheese mixture into the freezer bowl and start churning. When the mixture is already quite thick, add gradually the blueberry puree. Once churned, transfer to an airtight container and let the ice cream solidify for few hours in the freezer. Before eating, put in the fridge for 20 to 30 minutes to soften the texture, and then start scooping.

The result: To be honest, Philadelphia-style ice cream is best eaten right out of your ice cream maker or after a few hours in your freezer (but still great after few days, and I’m currently writing this post while eating ice cream, for breakfast!). The ice cream was intensively flavored and smooth, more refreshing than a custard-based ice cream and a bit lighter (but still very rich thanks to the goat cheese and cream). Enjoy!

goat cheese blueberry honey ice cream 2

let them eat ice cream (for the pool-less on a hot day)

photo (1)

A recent acquisition in my kitchen is an appliance that I probably would never purchase. It is, however, an appliance that someone might buy raffle tickets to win but after the excitement of the prize, it might sit in the basement, forgotten about until spring cleaning. That someone is a very kind colleague and the prize appliance is the Cuisinart Soft Serve Ice Cream Maker. My colleague asked if I would like the long forgotten ice cream maker. Without any hesitation (who would hesitate? It’s a FREE ICE CREAM MAKER!) I said yes and long story short, I, Em of deuxdilettantes, am the proud owner of a soft serve ice cream maker.

The timing of this addition to my kitchen couldn’t be any more perfect. With the recent change of temperature (hello Lake Washington, my savior from the heat), a bit of homemade ice cream felt just right. I invited Bee to join me in the christening of the ice cream maker. The whole event was a bit comical. It must have been 90 degrees in my flat. I don’t have AC and the windows hardly open. We watched the neighbors frolic in their pool as we made ice cream and wondered if we could tempt them with cool treats so that we might take a dip in the refreshing water. I’m pretty sure we made all the rookie mistakes as we created a lovely ice cream mess in my kitchen.

IMG_2473

It was messy (and that picture was taken after we cleaned up) but we had a blast. And we ended up with darn good ice cream.

Even if your not crazy about our flavor combinations, at least consider the following two tips:

1. The freezer bowl MUST be cold. The owner manual suggests 12 hours in the freezer but I suggest 24 hours just to be safe.

2. Adding anything solid (dare I suggest chocolate chunks?!) to the milk/cream liquid mixture WILL clog the machine and create a mess. We suggest allowing the mixture to thicken and then add, slowly.

photo

Lavender cardamom vanilla with chocolate chunk ice cream

Yields 1.5 pints

Ingredients

  • 1 cup whole milk (plus extra)
  • 1/4 cup lavender
  • 10 pods cardamom (split open)
  • 1/4 teaspoon vanilla
  • 1/2 cup sugar
  • 2 cups heavy cream (very cold)
  • 1/3 cup coarsely chopped dark chocolate

1. Combine 1 cup milk, lavender, cardamom and vanilla in a medium sauce pan. Bring to simmer and then reduce heat to low / low-medium. Gently stir and cook for about 20 minutes.

IMG_2458

2. Strain mixture and discard lavender buds and cardamom pods. Pour the mixture into a measuring cup and top off milk mixture to measure 1 cup. Put in refrigerator or over an ice bath.

3. Once milk is cold, pour into a mixing bowl and add sugar. Whisk or mix until sugar is dissolved. Then add cream. Mix and pour into freezer bowl. Turn on ice cream machine and let it do its magic.

4. As the milk/cream mixture starts to thicken to a soft serve consistency begin to add chocolate chunks a small spoonful at a time. Once the mixture is past soft serve consistency but prior to ice cream, turn off the machine and begin to scoop out ice cream into a freezer safe container. Freeze until mixture has hardened and then serve! Or serve immediately as soft serve!

Dutch chocolate with cinnamon and chocolate chunk ice cream

Yields 1.5 pints

Ingredients

  • 2/3 cup unsweetened Dutch processed cocoa powder
  • 1/2 cup sugar
  • 1/3 cup firmly packed brown sugar
  • 1 cup whole milk (very cold)
  • pinch cinnamon powder
  • pinch cayenne pepper
  • 2 cups heavy cream (very cold)
  • 1/4 cup coarsely chopped dark chocolate

1. Combine the cocoa powder with sugars in a medium bowl. Mix until lumps are removed.

2. Add the whole milk and mix until smooth. Add cinnamon, cayenne and heavy cream. Mix and pour into freezer bowl.

3. Turn on ice cream maker and allow to mix.

4. As the milk/cream mixture starts to thicken to a soft serve consistency begin to add chocolate chunks a small spoonful at a time. Once the mixture is past soft serve consistency but prior to ice cream, turn off the machine and begin to scoop out ice cream into a freezer safe container. Freeze until mixture has hardened and then serve! Or serve immediately as soft serve!

DSC_2914

Strawberry with balsamic caramel ice cream

Yields 1.5 pints

Ingredients

  • 1/3 cup and 2 tablespoons granulated sugar
  • 1 tablespoon water
  • 1/3 cup balsamic vinegar
  • 1 cup whole milk (very cold)
  • 1/2 cup firmly packed brown sugar
  • 1 teaspoon vanilla
  • 2 cups heavy cream (very cold)
  • 1 pint strawberries, hulled and pureed

1. Combine the granulated sugar, water and balsamic vinegar in a shallow pan. Bring to a boil and then reduce heat. Let simmer for about 15 minutes – until the consistency is thick and syrupy but not yet a caramel. Remove from heat and pour into a heat safe container. Set aside and allow mixture to thicken as it cools.

2. In a medium mixing bowl, combine the whole milk, brown sugar and vanilla. Whisk or mix until smooth. Then add heavy cream. Stir and then add to freezer bowl. Start mixing and as mixture thickens begin to add the strawberry puree, slowly.

DSC_2955

Allow mixture to continue to thicken and then slowly add the balsamic caramel.

DSC_2968

Once the mixture is past soft serve consistency but prior to ice cream, turn off the machine and begin to scoop out ice cream into a freezer safe container. Freeze until mixture has hardened and then serve! Or serve immediately as soft serve!

DSC_2982

As I write this, I realize that over the past week I have eaten more ice cream than I should ever admit to. But hey, that was all for research! It doesn’t count. We are dreaming up all sorts of ideas for the machine. There has been discussion of coconut milk… almond milk… sorbets… oh the possibilities!

Have a lovely week and stay cool. And eat ice cream!

XOXO, Em

the ultimate refresher: the pimm’s cup

Pimm's Cup

How are you planning to celebrate the Fourth of July? For us, it will be spending time with friends, grilling fresh fish on the barbecue, watching the fireworks, of course, and… Em and I have talked about going swimming in Lake Washington. (Call us crazy! I just hope I won’t die of hypothermia.)

And to mark the holiday, deuxdilettantes is proposing a little cocktail recipe that might soon become one of your summer favorites. Forget mojitos and caipirinhas. Get ready to fall for the Pimm’s Cup, an iconic garden-party drink that is to Wimbledon what the mint Julep is to the Kentucky Derby. A British cocktail on July 4th? Yes, there is really nothing better on a hot day than this long icy drink. Just think of it as a conciliatory gesture toward our one-time colonial overlords.

4 Pimm's Cup

I already mentioned that every time my husband and I go to New Orleans we have to stop at the Napoleon House* to get their house drink, and somehow the Pimm’s Cup found its way into our cocktail routine — or, should I say, his cocktail routine.

Although I’m liable to produce batch after batch of macarons in pursuit of perfection, I have very little patience with cocktails, and I’m just happy to sit, sip and enjoy. My husband, on the other hand, showed some interest, and I sort of encouraged him… very strongly. When I moved in with him, I needed to reclaim the tiny kitchen that was full of glasses and liquor bottles — a misuse of precious cooking space! — so I suggested that we buy a bar. I sold him on the idea by insisting that it would be a great opportunity for him to perfect his mixology skills, but it was really all about space optimization. Not that I’m complaining in the end — How cool is it to have a bartender at home, right? — but I may have created a monster: Not a dinner with friends goes by without some new cocktail experiment, nor a date at a cocktail bar without him trying to recreate a drink at home. But back to the Pimm’s Cup.

Pimm's

The Pimm’s Cup is a great summer cooler and can easily replace the overdone mojito and gin tonic, or even a beer. It will add a slight touch of class to even the most casual barbecue. Another great point: The alcohol content of Pimm’s is relatively low compared to other spirits (25%), and I found myself drinking a couple without even noticing.

For a Pimm’s Cup, you will need Pimm’s No. 1, a light gin-based liqueur with herbs, spices and citrus. And if you wonder why this liqueur is numbered, it’s because there used to be five other sorts of Pimm’s, respectively based on Scotch, brandy, rum, rye and vodka. Today, aside Pimm’s No.1, only Pimm’s No. 6 with a vodka base is still available (as well as No. 3 but seasonally and in confidential quantity). All the other kinds were phased out.

Ingredients Pimm's Cup

The Pimm’s Cup is subject to multiple interpretations. Besides the base liqueur, it may contain any combination of cucumber, orange, lemon, strawberries, mint, rosemary and sometimes maraschino cherries(!). My favorite garnish is cucumber, mint, rosemary and some citrus. Add some fizz (ginger ale, lemon soda or sparkling lemonade), adjust your hat (it’s a garden party after all), and sip while soaking up the sun. The traditional recipe contains 1 measure of Pimm’s for 3 measures of fizz.

the deuxdilettantes Pimm’s Cup (courtesy of Mr. E, aka the hubby)

Yields about 10 drinks.

Ingredients

  • 1 bottle of Pimm’s No. 1
  • 1/2 unpeeled cucumber cut into 1/4-inch slices
  • 3-4 sprigs of mint
  • 3-4 sprigs of rosemary
  • 1/2 orange quartered
  • Lemon soda (Sprite or 7-Up), lemonade or ginger ale
  • Ice cubes

In a large pitcher, place the herbs, cucumber slices and orange quarters and muddle. Pour over a bottle of Pimm’s and allow to rest for at least a couple of hours in the fridge.

Muddling the ingredients

To serve, fill a highball glass with ice and pour in the Pimm’s mixture to fill about 1/4 to 1/2 of the glass. Top with ginger ale, lemon soda, lemonade or even Champagne or sparkling wine for a Pimm’s Royal. Garnish with mint or rosemary, cucumber and an orange slice.

Happy sipping!

Bee

*Speaking of the Napoleon House, when my husband was a kid in Louisiana, he met Sal Impastato, a famous Louisiana restaurateur and current owner of the Napoleon House, which is said to be the biggest buyer of Pimm’s in the U.S. If my husband had known at that time, maybe he would have asked Sal about his secret recipe for a perfect Pimm’s Cup.

Pimm's